
Table of Contents
- Key Takeaways
- First Determine What Kind of LVP Floor You Have
- Five Questions That Decide Whether a One-Plank Repair Makes Sense
- What to Photograph Before Requesting LVP Repair
- A Real Localized LVP Repair in Parrish
- When a Repair Request Is a Good Fit
- When a Flooring Specialist or Larger Project May Be Needed
- How to Reduce Future LVP Damage
- Request a Localized LVP Repair Review in Parrish
- Sources
A damaged luxury vinyl plank does not automatically mean the entire floor must be replaced. In many installations, one plank or a small group of planks can be repaired or replaced. The practical answer depends on the flooring system, the location of the damage, whether an exact replacement plank is available, the condition of the locking edges, the path needed to reach the area, and whether moisture or subfloor movement caused the problem.
Yes, one damaged LVP plank can often be replaced—but not every floor supports the same repair method. A floating click-lock floor may need to be disassembled from the nearest practical wall, while loose-lay and glue-down products follow different manufacturer procedures. A successful repair also requires a compatible replacement plank and a dry, flat, stable substrate. If the damage comes from an active leak, widespread movement, broken joints across multiple rows, or a subfloor problem, replacing one visible plank will not solve the underlying cause.
Key Takeaways
- Identify the product before choosing a method. Floating click-lock, loose-lay, and glue-down LVP are not repaired the same way.
- An exact spare plank matters. Thickness, locking profile, dimensions, color, texture, and attached pad must be compatible.
- Access can determine the cost. A plank near a removable wall edge may be practical to reach; an isolated plank beneath cabinets or across several rooms may not be.
- Fix the cause first. Moisture, an uneven subfloor, restricted expansion, heavy rolling loads, or installation damage can make a spot repair fail again.
- Do not force the joints. Damaged click-lock edges can spread gaps or peaking into neighboring rows.
First Determine What Kind of LVP Floor You Have
“LVP” describes the appearance and material category, not one universal installation system. The carton label, purchase receipt, product number, leftover planks, and manufacturer instructions are more useful than the brand name alone. Avoid cutting or lifting the damaged piece until the floor type is confirmed.
Floating click-lock planks
These planks connect at their long and short edges and rest over the substrate without being fastened through the field of the floor. Manufacturer instructions commonly require perimeter expansion space and a clean, flat, dry, stable subfloor. A conventional repair may involve removing base or transition trim and carefully disassembling rows from an accessible edge until the damaged plank can be exchanged. CALI’s current installation guidance, for example, shows whole rows being lifted and the planks separated in the product-specific direction.
Glue-down planks
Glue-down LVP is bonded to the substrate. Removing one plank can involve cutting and lifting the damaged material, preparing the substrate, selecting the specified adhesive, and controlling adhesive transfer and cleanup. The correct process depends on the product and adhesive system. A method intended for a floating floor should not be applied automatically to glue-down flooring.
Loose-lay or specialty locking products
Some products rely on weight, backing, perimeter adhesive, pressure-sensitive systems, or a proprietary overlap. These may allow a more direct plank replacement, but only when the manufacturer’s instructions for that exact collection are followed. Shaw’s published StaTite instructions, for example, contain a product-specific heat-and-release replacement procedure that should not be generalized to ordinary click-lock LVP.
Five Questions That Decide Whether a One-Plank Repair Makes Sense
1. Is a truly compatible replacement available?
The best source is an unused plank from the original installation with its carton label. A visually similar plank from a store may have a different thickness, width, locking profile, bevel, wear layer, attached pad, or printed pattern. Even the correct product can show a color difference after the installed floor has aged in sunlight. Keep spare planks flat, dry, protected, and labeled for future repairs.
2. What caused the damage?
A dropped object or isolated gouge is different from a plank that lifted because the floor is pinched at a wall, fastened through a floating section, exposed to moisture, or moving over an uneven substrate. CALI advises that jobsite and subfloor conditions must be appropriate and warns that plumbing leaks, flooding, and substrate moisture can affect a vinyl floor even when the flooring material is marketed as waterproof. The visible plank is sometimes the symptom rather than the cause.
3. Can the damaged area be reached without creating more damage?
For a floating floor, count the rows from the damaged plank to each practical wall or transition. Note islands, cabinets, door jambs, toilets, heavy furniture, transitions, and continuous flooring into other rooms. The shortest-looking route is not always removable. Flooring installed beneath fixed cabinets or trapped by fasteners may not move as designed.
4. Are the neighboring locking edges still sound?
Chipped tongues, crushed grooves, gapping, peaking, and broken end joints can extend beyond the visibly damaged plank. If several neighboring joints no longer lock tightly, the repair may need more than one replacement piece. Manufacturer instructions repeatedly emphasize inspecting seams and reinstalling boards when gaps appear rather than forcing the floor forward.
The localized replacement method Cory uses when conditions allow
For selected click-lock repairs, Cory follows the localized multi-plank replacement approach demonstrated in “Dreaded Vinyl plank repair made easy, multiple pieces” by Floors by Southern boys. This can avoid disassembling an entire floor from a distant wall, but it is not suitable for every product or condition. Some lower-quality LVP is too brittle and its locking edges break during removal or fitting. A floor that has expanded, is pinched, or has insufficient movement space may also leave too little room for the replacement pieces to fit and lock properly. In those cases, forcing the new plank can damage adjacent boards or hide the condition that caused the problem.
The repair decision is made after handling the installed material—not from a photo alone. Plank flexibility, locking-edge strength, existing compression, and usable working space can change the recommendation once the damaged area is opened. A method that works well on a stable, serviceable product may break a brittle plank or fail on an expanded floor.
5. Is the substrate dry, flat, clean, and stable?
Pergo’s published resilient-floor instructions require water-damaged, swollen, or delaminated wood subflooring to be replaced and set product-specific moisture and flatness limits. Those numbers are not universal; the instructions for the installed floor control. Softness, recurring moisture, widespread movement, or a significant low or high area should be evaluated before a new plank is locked into the same condition.
| Condition | One-plank repair leans stronger | Wider correction leans stronger |
|---|---|---|
| Replacement material | Exact labeled spare plank is available. | No compatible plank, locking profile, or color is available. |
| Damage pattern | One isolated scratch, chip, burn, or impact. | Multiple gaps, lifted rows, moisture damage, or repeating breakage. |
| Access | Practical disassembly path from removable trim or a transition. | Floor is trapped beneath fixed work or spans several rooms without a usable break. |
| Neighboring joints | Adjacent planks remain flat and lock securely. | Several tongues, grooves, or end joints are broken. |
| Substrate | Dry, clean, flat, stable, and within the product instructions. | Leak, moisture, softness, movement, or unevenness remains unresolved. |
What to Photograph Before Requesting LVP Repair
- One wide photo showing the damaged plank’s location in the room.
- Close photos of the damage and all four surrounding seams.
- The nearest walls, baseboards, transitions, doorways, cabinets, and fixed objects.
- The back, edge profile, and label of any spare plank.
- The original carton label, receipt, or product number if available.
- Any signs of water, staining, softness, lifting, or gaps elsewhere in the floor.
- Approximate distance and row count from the damaged plank to the nearest practical edge.
Do not pry up an edge merely to take a better photo. A click-lock joint can be damaged by lifting it in the wrong direction or at the wrong point in the row. Do not cut a plank when the product type, replacement method, or substrate condition is uncertain.
A Real Localized LVP Repair in Parrish
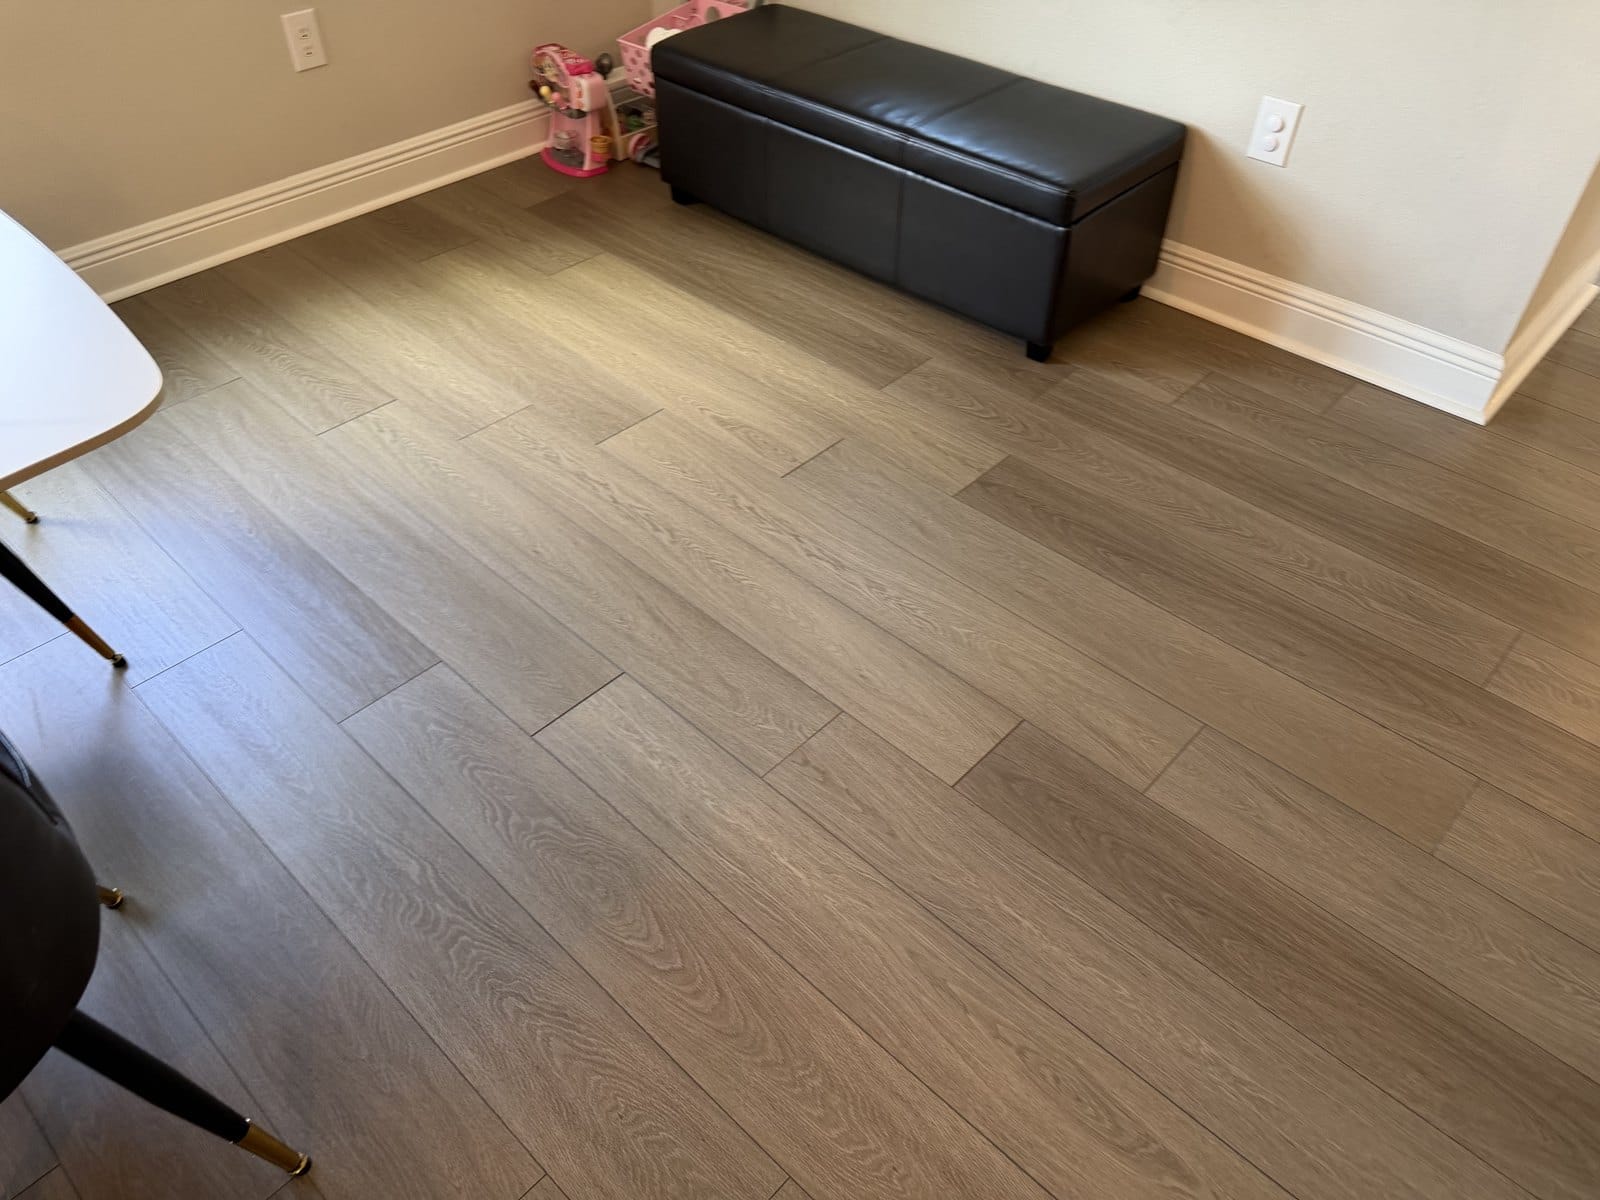
The photo below documents a completed localized LVP flooring repair performed by Richter’s Reliable Services in a Parrish home. It demonstrates that a limited repair can be practical when the flooring, access, replacement material, and site conditions support it. It does not imply that every damaged plank can be repaired by the same method.
When a Repair Request Is a Good Fit
- The damage is limited to one plank or a clearly defined small area.
- An exact or manufacturer-confirmed compatible spare plank is available.
- The likely access path, transitions, and fixed objects can be shown in photos.
- There is no active leak, wet substrate, mold concern, or unresolved source of movement.
- The request is for selected repair rather than full-room flooring installation.
When a Flooring Specialist or Larger Project May Be Needed
- Damage or joint failure continues across several rows or rooms.
- The floor is buckling, peaking, separating widely, or pinched by fixed construction.
- There is active moisture, a plumbing leak, a damaged subfloor, mold, or structural movement.
- No compatible replacement material exists and appearance continuity is important.
- The repair requires extensive cabinet, toilet, door, or built-in removal.
- The request is a full-room installation, refinishing project, or insurance/restoration scope.
How to Reduce Future LVP Damage
Use suitable floor protectors beneath furniture, remove grit that can act like sandpaper, and move heavy appliances with appropriate protection rather than dragging or rolling concentrated loads directly across the planks. Clean according to the flooring manufacturer’s instructions. CALI’s vinyl-care guidance advises prompt spill cleanup and warns that rolling appliances or heavy carts with small wheels can damage the floor. Preserve several labeled spare planks whenever possible; future product availability and dye-lot appearance can change.
Request a Localized LVP Repair Review in Parrish
Richter’s Reliable Services evaluates selected localized LVP repairs in Parrish and considers nearby Ellenton, Palmetto, and Lakewood Ranch projects case by case. Send wide and close photos, the spare plank and label, the damage location, and any moisture or movement history. Cory will explain whether the request appears to fit the handyman scope and what information is still needed before scheduling.
This guide compares published manufacturer instructions for several resilient-floor systems with practical repair-planning factors. Flooring products differ substantially, so the instructions, warranty, adhesive, and technical guidance for the exact installed product control. The article does not diagnose moisture, mold, structural movement, or substrate failure and does not promise that a matching plank or invisible repair is possible. The firsthand image documents a completed local repair but is not a universal procedure. Substantively reviewed September 1, 2026.
Sources
- CALI: Vinyl Loose-Lay Flooring Installation and Plank Disassembly Guidance
- CALI: Select SPC Vinyl Installation, Subfloor, Moisture, Expansion, and Care Guidance
- Pergo / Mohawk Technical Services: Pergo Extreme Installation Instructions
- Shaw Floors: Vinyl Flooring Installation Resources
- COREtec: Installation, Maintenance, and Plank Replacement Resources
- Floors by Southern boys: Dreaded Vinyl Plank Repair Made Easy, Multiple Pieces — the localized repair demonstration Cory follows when the product and site conditions support it.
- Use the installation and warranty documents for the exact flooring collection as the controlling source for any repair.
Related Tips & Guides
Browse All Tips & Guides →
Appliance Repair or Replace? A Parrish Homeowner Decision Guide

Refrigerator Not Cooling? Safe Airflow Checks Before Service
Electric Dryer Runs but Does Not Heat? Safe Checks Before Service
