
Table of Contents
- Key Takeaways
- Seven Checks Before Adding Shiplap to a Kitchen Island
- 1. Is the existing surface flat, dry, and securely attached?
- 2. What will hold the new material?
- 3. Will added thickness interfere with anything?
- 4. How will outlets, switches, vents, and plumbing be handled?
- 5. Where will full boards, narrow cuts, and seams land?
- 6. How will the corners and exposed edges finish?
- 7. Is the project paint-ready or fully finished?
- What to Photograph Before Requesting an Island Paneling Project
- A Real Kitchen Island Shiplap Project
- When This Kind of Project May Be a Good Fit
- When a Cabinet, Electrical, Plumbing, or Restoration Specialist May Be Needed
- Request a Kitchen Island Shiplap Review in Parrish
- Sources
Kitchen island shiplap can often be added to an existing island to give a plain cabinet back or end panel more depth and character. For Parrish, FL homeowners, the best result depends less on the word “shiplap” than on the island’s substrate, panel thickness, trim plan, outlet locations, door and drawer clearances, countertop overhang, and how the new surface will be finished.
Yes, many existing kitchen islands can accept decorative shiplap or nickel-gap paneling without rebuilding the cabinets. Before material is selected, inspect whether the visible surfaces are flat and sound, locate framing or a suitable fastening substrate, measure every edge and clearance, and decide how corners, toe kicks, outlets, seams, and the countertop overhang will be handled. Electrical devices should not be buried, crowded, or altered as part of decorative carpentry; any electrical relocation or code question belongs with an appropriately licensed professional.
Key Takeaways
- Start with the island, not the style photo. Substrate, trim, clearances, outlets, and ventilation determine what can be added safely and cleanly.
- Panel thickness changes the finished dimensions. Corners, toe kicks, appliance openings, doors, and countertop seating space all need to be checked.
- Layout is visible. Board width, gap spacing, seam placement, and the height of the first and last courses affect whether the work looks intentional.
- Finish scope should be agreed on. A carpentry-only installation, a paint-ready installation, and a fully primed and painted result are different projects.
- Decorative paneling is not structural. It should not be used to correct a loose cabinet box, damaged island, moisture problem, or inadequate support.
Seven Checks Before Adding Shiplap to a Kitchen Island
1. Is the existing surface flat, dry, and securely attached?
Decorative boards follow the surface beneath them. A bowed skin, loose end panel, swollen particleboard, water damage, or movement at the cabinet box can remain visible after installation or cause joints and trim to open later. Metrie advises cleaning and completely drying the receiving surface, while UFP-Edge advises acclimating wood, keeping it dry, and checking product condition before installation. Those are useful planning principles even when the exact product is different.
2. What will hold the new material?
An island may have finished cabinet panels, thin decorative skins, plywood, MDF, framed sections, or a mix of materials. The fastener and adhesive plan must match both the paneling product and the substrate. Manufacturer instructions commonly distinguish fastening into framing from installing over an existing panel. Adhesive is not a substitute for every fastening requirement, and an aggressive adhesive can make future removal difficult or damage the cabinet finish.
3. Will added thickness interfere with anything?
Measure the panel thickness plus any backer, trim, or corner treatment. Check cabinet doors and drawers, toe-kick depth, floor transitions, base trim, dishwasher or beverage-appliance openings, seating clearance, and the amount of countertop overhang that will remain. A design that looks fine on a broad island back may be too thick beside a door, end panel, or appliance opening.
4. How will outlets, switches, vents, and plumbing be handled?
Record every device and opening before layout. Decorative material should finish neatly around approved electrical boxes without burying devices or improvising extensions. Do not cover ventilation, access panels, plumbing shutoffs, or manufacturer-required openings. If the design requires moving or modifying wiring, boxes, receptacles, or plumbing, separate that regulated work from the carpentry scope and use the appropriate licensed trade.
5. Where will full boards, narrow cuts, and seams land?
Measure the visible height and width after accounting for base, top, and corner trim. A quick dry layout helps avoid an awkward sliver at the top or a conspicuous seam beside an outlet. UFP-Edge’s instructions emphasize starting level, fastening to a suitable substrate, and following the profile-specific overlap. The exact sequence must follow the selected product.
6. How will the corners and exposed edges finish?
Outside corners draw attention. Options can include square edge trim, a mitered treatment, a compatible corner profile, or paneling that stops cleanly within an existing frame. The best choice depends on the material, impact exposure, paint plan, and the island’s existing lines. Trim dimensions should be selected before boards are cut because the trim changes the field width.
7. Is the project paint-ready or fully finished?
Bare or site-cut material may still need nail-hole filling, gap decisions, sanding, cleaning, primer, and finish coats. Sherwin-Williams recommends that bare wood and patched areas be cleaned, smoothed, and primed before the topcoat; its paneling guidance also notes that primer selection and surface preparation affect adhesion. Prefinished paneling has different touch-up rules. Decide who owns caulk, filler, primer, paint, color matching, and final touch-up before work begins.
| Condition | Project leans stronger | More evaluation is needed |
|---|---|---|
| Island condition | Cabinet box and visible panels are dry, stable, flat, and secure. | Swelling, water damage, loose panels, or structural movement is present. |
| Clearances | Added thickness leaves doors, drawers, seating, toe kicks, and appliances unobstructed. | The design crowds an opening, appliance, walkway, or overhang. |
| Devices and access | Outlets and access points can remain properly accessible within an approved scope. | Wiring, boxes, plumbing, or ventilation must be moved or concealed. |
| Layout | Board courses, gaps, seams, and trim can be balanced before cutting. | The selected width creates narrow strips or awkward seams at focal points. |
| Finish | Material, filler, primer, paint, and touch-up responsibility are defined. | The expected “finished” appearance has not been matched to the actual scope. |
What to Photograph Before Requesting an Island Paneling Project
- A straight-on photo of every island face that may receive paneling.
- Wide photos showing the countertop overhang, seating, walkways, and nearby appliances.
- Close photos of outside corners, toe kicks, base trim, and the top edge below the counter.
- Every outlet, switch, vent, access panel, plumbing opening, door, and drawer near the work.
- Photos of swelling, water marks, loose panels, damage, or uneven areas.
- Overall height and width plus the depth of the countertop overhang.
- A product link or photo showing the desired board profile, width, orientation, color, and finish.
A Real Kitchen Island Shiplap Project
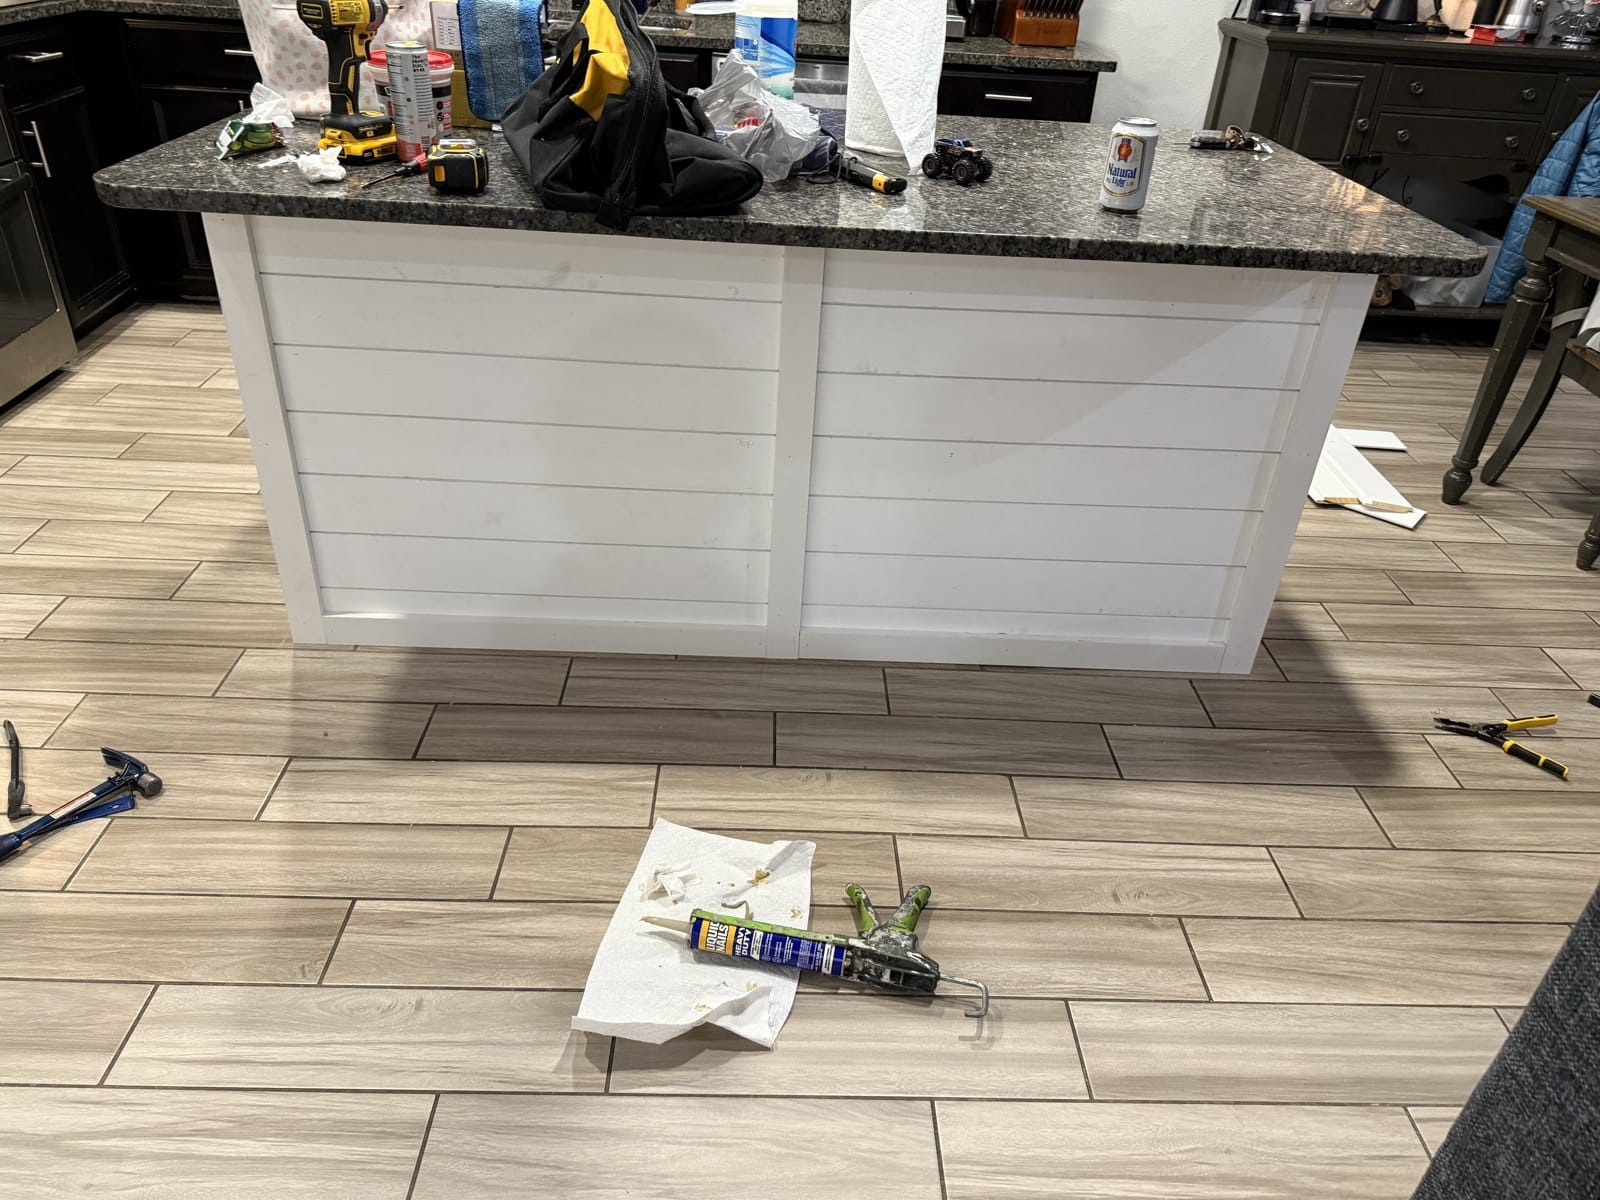
The photo below documents shiplap Cory added to an existing kitchen island. It was photographed before the material received its final painted finish, so it is useful for showing the carpentry layout and scope—not as a claim that the pictured stage is a completed paint result.
When This Kind of Project May Be a Good Fit
- The island is stable, dry, and in sound condition.
- The request is decorative paneling or trim rather than cabinet reconstruction.
- The added thickness does not compromise doors, appliances, seating, or walkways.
- Outlet and access details can remain compliant without unlicensed electrical or plumbing work.
- The desired material, orientation, trim treatment, and finish responsibility are clear.
When a Cabinet, Electrical, Plumbing, or Restoration Specialist May Be Needed
- The cabinet box is loose, damaged, swollen, or supporting an unresolved countertop concern.
- There is active moisture, mold, plumbing leakage, or concealed damage.
- The design requires electrical-device relocation, new circuits, plumbing changes, or regulated permit work.
- Appliance clearances, ventilation, or manufacturer service access would be reduced.
- The scope is a full cabinet replacement, structural alteration, stone-countertop change, or insurance restoration project.
Request a Kitchen Island Shiplap Review in Parrish
Richter’s Reliable Services evaluates selected kitchen-island shiplap and decorative paneling projects in Parrish, with nearby Ellenton, Palmetto, and Lakewood Ranch requests considered case by case. Send wide and close photos, approximate measurements, the desired material or inspiration, and whether you want carpentry only, paint-ready work, or a separately defined finish scope. Cory will explain what appears practical and what must be clarified before scheduling.
This guide compares current manufacturer installation and finishing guidance with practical project-planning factors. The selected product’s instructions, the island’s actual construction, appliance requirements, and applicable local rules control. The article does not provide electrical, plumbing, structural, mold, or countertop-engineering advice. The firsthand image documents a real island paneling project before paint and is not a universal installation procedure. Substantively reviewed September 1, 2026.
Sources
- UFP-Edge: Shiplap Installation Resources and Product-Specific Guidance
- UFP-Edge: How to Install Rustic Shiplap Cladding
- Metrie: Installing Shiplap in a Home Interior
- Sherwin-Williams: Wood Paneling Preparation, Priming, and Painting
- Sherwin-Williams: Surface Preparation for Bare Wood and Existing Finishes
- Use the instructions for the exact paneling, adhesive, fastener, primer, and coating products selected for the project.
Related Tips & Guides
Browse All Tips & Guides →
Can One Damaged LVP Plank Be Repaired or Replaced?

Home Assistant vs. Alexa vs. Google Home for Parrish Homes

TP-Link Omada vs. Consumer Mesh Wi-Fi for Parrish Homes

Considering Shiplap for Your Kitchen Island?
If this project is outside your comfort zone, Richter's Reliable Services is here to help.
Explore Custom Woodworking & Island Paneling